[sorry, this article has not been fully translated yet…]
Yamaha styles provide a Fill-In for each main variation (A-D) and additionally a Break Fill. The length of these Fill-Ins and Breaks is always one measure. They inlude a variation of the rhythm pattern (parts RHY1 and RHY2) as well as variations of the instrumental parts (BASS, CHD1, CHD2, PAD, PHR1, PHR2).

In principal you may trigger a Fill-In or Break Fill at any time. However you should be aware that the style engine will only generate musical content that makes sense at the given tick:
- The rhythm parts (RHY1 and RHY2) may be triggered at any tick. The rhythm pattern of the currently sounding main variation will be replaced by the pattern of the fill as soon as you hit the fill button.
- The instrumental parts (BASS, CHD1, CHD2, PAD, PHR1, PHR2) behave differently and there is a reason for this. In general it’s just not possible to replace an instrumental pattern in the middle of a measure with a different pattern. The musical content of these two patterns won’t fit together (in a musical sense) most of the time. To avoid this the instrumental parts will only sound when triggered “near” the start of a measure (I will clarify what is meant by “near” below).
The instrumental parts of a fill contain a notable musical variety. It would be a shame to leave that musical content being generated to chance. To get the complete pattern to play the timing of hitting the fill button is crucial. Let’s hear that for the style LiveSoulBand, Variation C (all examples have been recorded using a Tyros 3):
Example 1a (fill-in triggered late: only the rhythm parts of the fill-in will sound)
In this example the fill-in is triggered late. The rhythm parts will sound, while the instrumental parts just continue to play the content of the main variation C. Now triggering the fill-in at the start of the measure surly makes a huge difference:
Example 1b (fill-in triggered at start of measure: both rhythm and instrumental parts of the fill-in will sound)
The brass section’s sound clearly places emphasis on the fill-in. It is obvious that with specific timing you’re able to provide a more varied and authentic accompaniment.
The instrumental parts of a Break Fill will typically pause for a measure while the drums feature a short solo part. Again the timing is crucial when triggering the break. Only when you hit the Break button at the start of the measure the complete pattern will be used and the instrumental parts will be silenced to feature the drums. If you trigger the break too late the rhythm parts of the break-fill will sound togehter with the instrumental parts of the main variation. The result is not a “real” break but a yet another simple fill-in as demonstrated using style 70’sChartSoul:
Example 2a (break fill triggered late: only the rhythm parts of the fill-in will sound)
In this case the drums will make a break, but the instrumetal parts continue to play. Only if you trigger the break fill at the start of the measure, the istrumental parts do complement the drums to generate a real break as in the following example:
Example 2b (break fill triggered at start of measure: both rhythm and instrumental parts of the fill-in will sound)
Remark: some styles do not feature a break in the classical sense as it wouldn’t fit the musical stylistics.
The correct timing to trigger a complete Fill-In / Break Fill
To trigger a complete (rhythm parts and instrumental parts) fill-in or break fill, the theoretical best timing is to hit the button exactly at the start of a measure. In the real world no human player will ever manage to deliver that kind of precision. Therefore the style engine allows for some tolerance. If you trigger the fill within an 8th note before or after the start of the measure the complete fill pattern will sound.
Be aware that it is desirable To hit the button before the start of the measure (the green area of the following graphic). In that case the style engine continues to play the current style variation until the end of the measure, and then starts the fill pattern exactly at the start of the next measure.
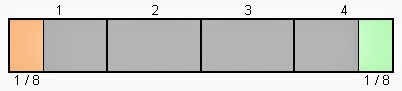
- Hit within an 8th note before start of the measure (green area):
The fill-in or break will sound completely in the next measure. - Hit within an 8th note after start of the measure (red area):
The beginning of the fill-in or break is missing, only the remaining part of the pattern will sound. - Within the “grey” area: Only the rhythm parts of the fill-in or break will play.
Löst man dagegen nach Taktbeginn aus (also im roten Bereich der Grafik), besteht folgendes Problem: die Begleitautomatik hat ja schon die ersten Noten der aktuellen Variation erzeugt. Diese müssen nun abgebrochen werden und durch das Fill-In oder Break ersetzt werden. Der bereits erwähnte musikalische Bruch ist also unvermeidbar, wobei es von den musikalischen Inhalten der Variation und des Fill-In abhängig ist, wie sehr der Bruch als störend empfunden wird.
Im folgenden Audiobeispiel (Style MovieSoundtrack Variation B) enthält das Break gleich zu Taktbeginn in den Begleitstimmen ein Sforzato:
Beispiel 3a (Break Fill vor oder exakt am Taktbeginn ausgelöst)
Löst man dieses Break zu spät aus, geht dieses Sforzato völlig verloren, es bleibt lediglich ein akzentuierter Schlagzeugeinsatz:
Beispiel 3b (Break Fill erst nach Taktbeginn ausgelöst)
Gestartetes Fill-In wieder stoppen
Sobald ein Fill-In oder Break einmal gestartet ist, kann man es mit einem Druck auf die selbe Taste auch wieder stoppen. Diese Funktion ist aber mit Bedacht einzusetzen, falls ein komplettes Fill-In inklusive der Begleitspuren gespielt wird. Denn dabei wird tatsächlich das Fill Pattern abgebrochen, und der Rest des Taktes durch die Main Variation ersetzt, was evtl. unpassend klingen wird. Geeignet ist diese Funktion daher eher, um eine Fehlbedienung schnell wieder zu korrigieren.
Im folgenden Beispiel (Style BaroqueAir) wird im Fill-In B ein kurzes Motiv eingeflochten:
Beispiel 4a (Fill-In komplett)
Ein Abbruch des Fill-In mit obiger Methode zerstört dieses Motiv und sollte also unterlassen werden:
Beispiel 4b (Fill-In komplett abgerufen, dann aber abgebrochen)
Auto Fill-In einmalig ignorieren
Das Stoppen des Fill-In lässt auch einsetzen, um bei eingeschaltetem Auto Fill-In einen Wechsel in der Variation vorzunehmen, ohne dass das Fill-In tatsächlich erklingt. Dazu drückt man die Taste der neuen Variation schnell zweimal hintereinander. Allerdings ist dies meist nur zu Taktbeginn zu empfehlen, da es ansonsten möglicherweise zu einem unpassendem Übergang führt.
Fill-Ins gezielt wählen
Generell erklingt beim Wechsel der Variation das Fill-In der neuen Variation, spielt man also beispielsweise gerade Variation B und man drückt Taste D, wird das Fill-In D abgerufen:
B -> Fill-In D -> D
Nun kann es aber gelegentlich sinnvoll sein, statt des Fill-In der Zielvariation lieber das Fill-In der aktuell erklingenden Variation zu nehmen.
B -> Fill-In B -> D
Das folgende Beispiel benutzt einen kombinierten Pop- (Variation B) / Jazz- (Variation D) Style, erzeugt also einen auffallenden stilistischen Wechsel. Ruft man die Variation D wie gewöhnlich ab, wird der Übergang zur Jazz Variation schon beim Fill-In eingeleitet:
Beispiel 5a (B -> Fill-In D -> D)
Verwendet man jedoch das Fill-In der Variante B und wechselt erst zum Taktbeginn auf die Jazzvariante, ist der Überraschungseffekt größer:
Beispiel 5b (B -> Fill-In B -> D)
Dies erreicht man durch den Einsatz der Registration:
- Variation D auf eine Registrationstaste legen und zwar nicht blinkend, damit das Fill-In D nicht abgerufen wird.
- Beim Spielen zuerst Taste B drücken (jetzt ertönt Fill-In B), danach die Reg Taste (dadurch wird beim Taktwechsel auf D geschaltet).
Manchmal möchte man eine bestimmte Main Variation beibehalten, aber nicht immer das selbe Fill-In abrufen, um den Rhythmuspart abwechslungsreicher zu gestalten, also z.B.:
C -> Fill-In A -> C -> Fill-In B -> C-> Fill-In C -> C
Im folgenden Beispiel wird immer die gleiche Main Variation verwendet und die Fill-Ins jeweils spät ausgelöst. Daher erklingt von der Begleitsektion immer unverändert das selbe Rock Pattern. Es werden aber drei verschiedene Drum Fill-Ins abgerufen, um das ganze realistischer zu gestalten (kein Rockschlagzeuger würde hier dreimal exakt das gleiche Fill-In spielen):
Beispiel 6 (drei verschiedene Fill-Ins, die Main Variation bleibt gleich)
Dies erreicht man, in dem bei laufender Variation C die Taste A drückt (jetzt ertönt Fill-In A) und rechtzeitig vor Ende des Taktes Taste C, um zur Variation C zurückzukehren. Vorsicht: ist man zu spät dran (also innerhalb der Achtelzone vor Taktende), wird zusätzlich das Fill-In C im darauffolgenden Takt abgespielt, was natürlich unerwünscht ist.
Pedal nutzen!
Richtiges Timing kann unter Umständen schwierig sein, denn möglicherweise sind gerade zum entsprechenden Zeitpunkt beide Hände in Aktion. In diesem Fall kann man die benötigte Funktion auf ein Pedal legen und so exakt auslösen. Natürlich ist das auch durch Einsatz eines Fuß-Controllers (z.B. MFC-10) möglich.